Playing & listening
How to Play a Gong: Mallets, Striking and Listening
Start with a securely supported gong, an appropriate padded mallet, and a gentle stroke that leaves the surface immediately after contact. Listen through the whole sound before playing again. The next step depends on the instrument: a Thai bossed gong and a flatter tam-tam do not call for identical striking instructions.
Identify the instrument before copying the technique
The word “gong” covers instruments with different shapes and musical roles. In particular, a prominent raised center, or boss, changes the question of where to begin playing. An online lesson showing a large flat disc may be demonstrating a tam-tam rather than the bossed gong in front of you.
Vienna Symphonic Library's gong guide describes the central boss as the normal striking point for the orchestral button gong. Its separate tam-tam guide describes an off-center starting point and emphasizes that the best position varies between instruments. The practical lesson is to identify the form and follow its maker's guidance.
An orchestral description does not establish that every bossed gong is tuned to a specified musical note. During practice, listen to the instrument you have: notice its recognizable tones and changing texture without trying to assign them from its diameter. The guide to Thai gongs explains distinctions between suspended gongs and gong-circle instruments.
Before playing, decide what you want to learn: one clear note, a long changing resonance, a quiet cue, or a repeated musical pattern. A useful technique serves that intention. There is no obligation to make the biggest sound the gong can produce.
Watch a short tam-tam playing lesson
Watch on Vic Firth’s YouTube channel · Read the maker’s lesson
Make the setup dependable and easy to reach
Use a suitable gong support within the limits stated in its published assembly instructions. Follow the documented suspension method and complete the assembly before playing. Do not improvise a wall fixing, a ceiling attachment, or a load rating from appearance.
Before every session, check that the support is stable, the suspension shows no visible damage, and the gong has room to move without contacting the frame or nearby furniture. Keep the area clear of passing people, pets, and loose objects. Set the playing height so you can reach the intended area without stretching, crouching awkwardly, or resting against the instrument.
Paiste's suspension guidance calls for periodic inspection of the hanging string and sufficient clearance for free movement. Apply those checks alongside the published instructions supplied with your equipment; this article does not provide structural installation specifications.
Choose your listener's position as deliberately as your playing position. Make a gentle test sound before inviting someone to sit nearby. If the support is unstable, damaged, or outside its documented use, leave the gong unplayed until the setup is suitable.
One suitable padded mallet is a better start than a bag of guesses
Begin with a purpose-made padded gong mallet suitable under your equipment's published instructions. Inspect the head before use: its covering should be intact, clean, and free of exposed hard parts that could contact the surface. Choose a handle you can guide comfortably.
Paiste's mallet guidance identifies size, weight, and material as influences on the sound and warns against tools that are too hard or sharp. Its model chart matches mallets to particular Paiste instruments. Use that as an example of specific matching, not as a universal diameter chart for other makers.
Get to know the mallet you have at a gentle level first. Keep the playing position steady and compare a small stroke with a slightly fuller one. Listen for a change in the contact sound as well as the sustained resonance. A familiar tool makes these comparisons easier to repeat.
Our advice is to learn a reliable single stroke before collecting specialist tools. Add another mallet when you can name the missing sound: a less prominent contact sound, a different articulation, or a particular musical effect. Friction mallets are a separate decision, covered in rubbing a gong for meditation.
Make the first strike small and let it finish
This is our suggested beginner sequence for a suitable padded mallet and a correctly installed gong. Follow any instrument-specific directions in the published instructions.
- Find the playing area. On many bossed instruments this means the central boss; do not assume the same location on a flat instrument.
- Take a comfortable grip. Hold the handle securely while allowing a small, controlled movement. Use a mallet you can stop and place accurately.
- Begin close to the surface. Make a gentle stroke rather than winding up for a dramatic blow.
- Move the head away after contact. Do not leave it pressed against the gong.
- Wait. Listen to the beginning, the developing sound, and the fading resonance before repeating.
Repeat the same gentle stroke several times with space between attempts. Your first goal is consistency: can you produce approximately the sound you intended without a surprise? A quiet, repeatable stroke teaches more than an occasional spectacular crash.
If something rattles, swings excessively, or feels difficult to control, pause to examine the setup and tool. Changing the stroke is useful only after those basics make sense.
Listen for four parts of the sound
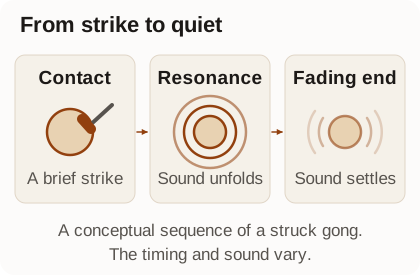
“Good sound” is too vague to guide practice. We suggest dividing what you hear into four observations. This is a listening framework, not a laboratory test or a quality score.
- Contact
- How noticeable is the instant the mallet touches? Is the beginning soft, distinct, or dominated by a knock?
- Development
- Does the sound seem present immediately, or does its character emerge after the initial contact?
- Body
- What attracts your attention in the sustained sound: one recognizable tone, several tones, a shimmer, or a rougher texture?
- Ending
- Does the sound fade in a way you like? Is there an unrelated rattle or interruption?
Use these words to compare two attempts. If you prefer the second, describe the difference before changing anything else. “Less knock at the beginning” helps you identify a repeatable choice. Notice what your hand did differently, then try that movement again.
Also listen from where the audience will sit. Ask a second person for their description without suggesting the answer. Your aim is not unanimous taste. It is to find out whether the sound you think you are making is the sound others are hearing in the space.
Build a small vocabulary of sounds
Once your basic stroke is steady, explore within the playing areas described in your instrument's instructions. Keep the same mallet and a gentle stroke while comparing the starting point with another documented area. Avoid striking suspension fittings, the stand, or a vulnerable rim.
Make a small written map rather than marking the metal. For each location, note the contact sound, the sustained character, and how useful it is for your purpose. Repeat the comparison on a later day before deciding that one position always behaves a certain way.
VSL's account of gong playing relates timbre to the mallet and attack. Our practical recommendation is to hold those choices steady while exploring position. If you change the tool, force, location, and rhythm together, you cannot tell which change you preferred.
A three-sound vocabulary is enough to make a short piece: perhaps a quiet opening, a fuller middle sound, and a restrained ending. Complexity can wait until those choices are repeatable.
Learn phrasing before building volume
Start with isolated strokes, then decide how much of the previous sound you want to hear when the next begins. Listen for two different effects: clearly separated events, and sounds that overlap into a continuous passage. Neither is inherently better.
Try a short phrase of three gentle strokes, each separated by a deliberate pause. Repeat it with longer pauses. Next, keep the pauses and make only the middle stroke slightly fuller. These are proposed practice variations; they help you hear timing and emphasis without requiring a loud climax.
VSL's tam-tam technique notes explain that repeated strokes can merge and that mallets should not damp the instrument during a roll. Its description concerns tam-tams; the exact stroke placement does not automatically transfer to every Thai gong. For early practice, explore overlap with ordinary, well-spaced single strokes. You do not need a continuous roll to make a coherent phrase.
Leave rolls until you can begin and end an ordinary phrase on purpose. Continuous sound can hide uneven playing. A clear ending, with enough time for the final resonance, often does more for the shape of a session than adding another layer.
Change one thing when the sound disappoints
Use the table to choose the next observation, not to diagnose a defect from a description. If the instrument or mounting appears damaged, stop using it. Do not adjust suspension hardware while the gong is moving.
| What you notice | Check first | A useful comparison |
|---|---|---|
| A loud knock before the resonance | Mallet suitability, head condition, and whether the stroke is larger than needed. | Inspect the padded head, then compare a shorter, gentler stroke. |
| A very short or muffled sound | Whether the mallet, clothing, frame, or another object remains in contact. | Repeat with clear rebound and free space. |
| Unwanted rattling | The support and nearby objects, with the gong quiet. | Identify the source before changing playing technique. |
| Too much sound for the room | Stroke size and listener position. | Try one much gentler stroke, then reassess the session. |
| Inconsistent first notes | Whether location and stroke change between attempts. | Repeat one comfortable movement at the same playing position. |
| Repeated strokes blur together | The amount of resonance remaining before the next stroke. | Increase the pause and decide whether you prefer separation or overlap. |
Do not assume a gong that resists one technique is poor quality. Review the tool, playing area, and sound expectation separately. Listen once for the contact, once for the body of the sound, and once for its ending. This gives you a manageable practice task instead of an instruction to hit harder.
A short listening session needs an intention, not a formula
For a personal meditation or quiet listening session, we favor a simple form: begin quietly, use a small number of deliberate sounds, and allow the last one to finish. Silence gives the sounds their shape and gives you time to attend to them.
You might begin with an intention, dedicate the session to someone, or let the gong mark a transition in your day. If you experience the instrument as a spiritual presence or feel a connection through its sound, allow that meaning its place. Curiosity, reverence, and simple enjoyment are all welcome approaches.
One possible structure is a quiet minute, several widely spaced strokes, a short familiar phrase, and a quiet ending. Treat that as an optional personal ritual. Listen without requiring a certain emotion or experience, and adapt the form to what feels meaningful to you.
When playing for another person, agree on the intended volume and an easy way to stop. Make the first sound gentle. Keep the session comfortable and end it when requested. The gong rubbing guide explains the separate friction technique and when to skip it. Padded single strokes remain a useful default for a listening practice.
Treat stopping and care as part of playing
Letting a sound decay naturally is the easiest starting point. Shape your early practice around that ending: play fewer notes and leave longer pauses. Damping shortens a note by contact, so use it only when it is described as suitable in your instrument's published instructions. Otherwise, let the sound finish.
A cloth or hand used in performance is still a contact material. Do not press an unfamiliar material against a treated surface just because a performance video shows it. Keep jewelry, exposed hardware, and rough objects away. Put the mallet where its head stays clean between sessions.
Use the gong's published care instructions rather than a generic metal-polishing recipe. A cleaning method intended for one instrument's coating may be unsuitable for another. The same applies to mallet cleaning: follow that tool's instructions and do not transfer its maintenance procedure to the gong.
After practice, note any change in the suspension, support, head covering, or finish. Keeping the equipment predictable is part of making the sound predictable.
A useful first week: repeat, describe, then expand
Here is an editorial practice plan you can adapt to your instrument. Short, attentive sessions are enough to work through it; no daily duration is prescribed.
- First session: check the setup and repeat gentle single strokes at the starting location.
- Second session: describe contact, development, body, and ending. Repeat the stroke you preferred.
- Third session: compare another documented playing area, or compare two gentle stroke sizes at the first location.
- Fourth session: make a three-stroke phrase and vary its pauses.
- Fifth session: play a short beginning, middle, and ending that you can explain afterward.
Progress means having more deliberate choices. You might discover that one mallet and one playing area already provide the sound you wanted. That is a useful result, not a reason to invent more exercises.
Bring a gong into your practice
Choose a finish and size from the current gongs and order online. You can use the existing sound previews if you would like to listen. Thai Gongs are handmade to order; catalogue images and audio are representative, and each completed instrument has its own individual character.
You can develop your playing as you spend time with the gong. Begin with a gentle padded strike, follow its resonance, and let your preferences emerge through practice. Isolated tones, overlapping phrases, and quiet personal ritual are possibilities to explore at your own pace.
Optional reading includes the size guide, choosing guide, and gongs in Thai ritual. More gong guides, frequently asked questions, and the returns policy are available whenever useful.
Sources & editorial notes
Researched by Thai Gongs Editorial. Sources accessed October 21, 2026. See our editorial approach and research limits.
- Percussion 101: Tam-tam. Vic Firth. Creator’s orchestral tam-tam lesson and official video. Instrument-specific placement is distinguished from bossed-gong playing.
- Gong: sound production and playing techniques. Vienna Symphonic Library. Orchestral button-gong starting point and influence of mallet and attack. Not evidence of catalog tuning, materials, or pitch guarantees.
- Tam-tam: sound production and playing techniques. Vienna Symphonic Library. Flat tam-tam distinction, variable off-center playing position, and principles of merging repeated strokes. Not universal Thai gong instructions.
- Gong mallets and stands. Paiste. Mallet size, weight, and material affect sound; hard or sharp tools may damage instruments; model chart is maker-specific.
- Gong support and handling. Paiste. Suspension inspection and free clearance. No DIY installation specifications or catalog finish compatibility are inferred.